This guide covers the steps you need to take your site live on Edgio with a secure, custom domain.
Creating custom domains is always done in the context of creating or updating an environment.
Configuration Overview
-
If needed, create an environment using instructions in Environments.
-
Create the Custom Domain.
-
Set up DNS for your custom domain.
-
Allowlist our network on your firewall.
-
Configure TLS/SSL for the domain.
Custom Domains
Before going live, you must create a production environment and configure your domains.
To configure your custom domains:
-
Navigate to a site, then open an existing environment or create a new environment. (To create an environment, use instructions in Environments.)
- For an existing environment, select the ENVIRONMENTS tab header, then click an environment name in the list of environments. Continue with the numbered steps below.
- For a new environment, the DEPLOYMENTS tab is displayed. Continue with the following steps.
-
Select the CONFIGURATION tab header.

-
Create a new draft version of the environment by clicking EDIT at the top of the page.
-
In the Domains section, click EDIT DOMAINS.

-
Enter a name in the Edit Domains dialog, then click APPLY.

-
Click ACTIVATE at the top of the page to enable the updated environment.

Migrating from Fastly
If you’re migrating to Edgio from Fastly, you will need to do the following before adding your domains to your Edgio environment:
- Contact Fastly support and request that control of your domains be transferred to Edgio. Be sure to explicitly list each domain that needs to be transferred and ask Fastly to contact
support@edg.ioif they need Edgio to confirm the transfer. - Before going live with Edgio, you will need to ensure that you’ve removed your domains from all active Fastly services. To remove domains from a service, clone the service, remove the domains, then activate the new version of the service. Once the new service version is activated you can add the domains to your Edgio environment and activate it.
Set up DNS
In order to configure your DNS provider to direct traffic for a particular set of domains to Edgio, you must create DNS records for your website. If you are launching a new site, then you can create the records whenever you feel ready. For sites that are already live, the DNS update is the last step. Once you have updated your DNS you are committed to launching.
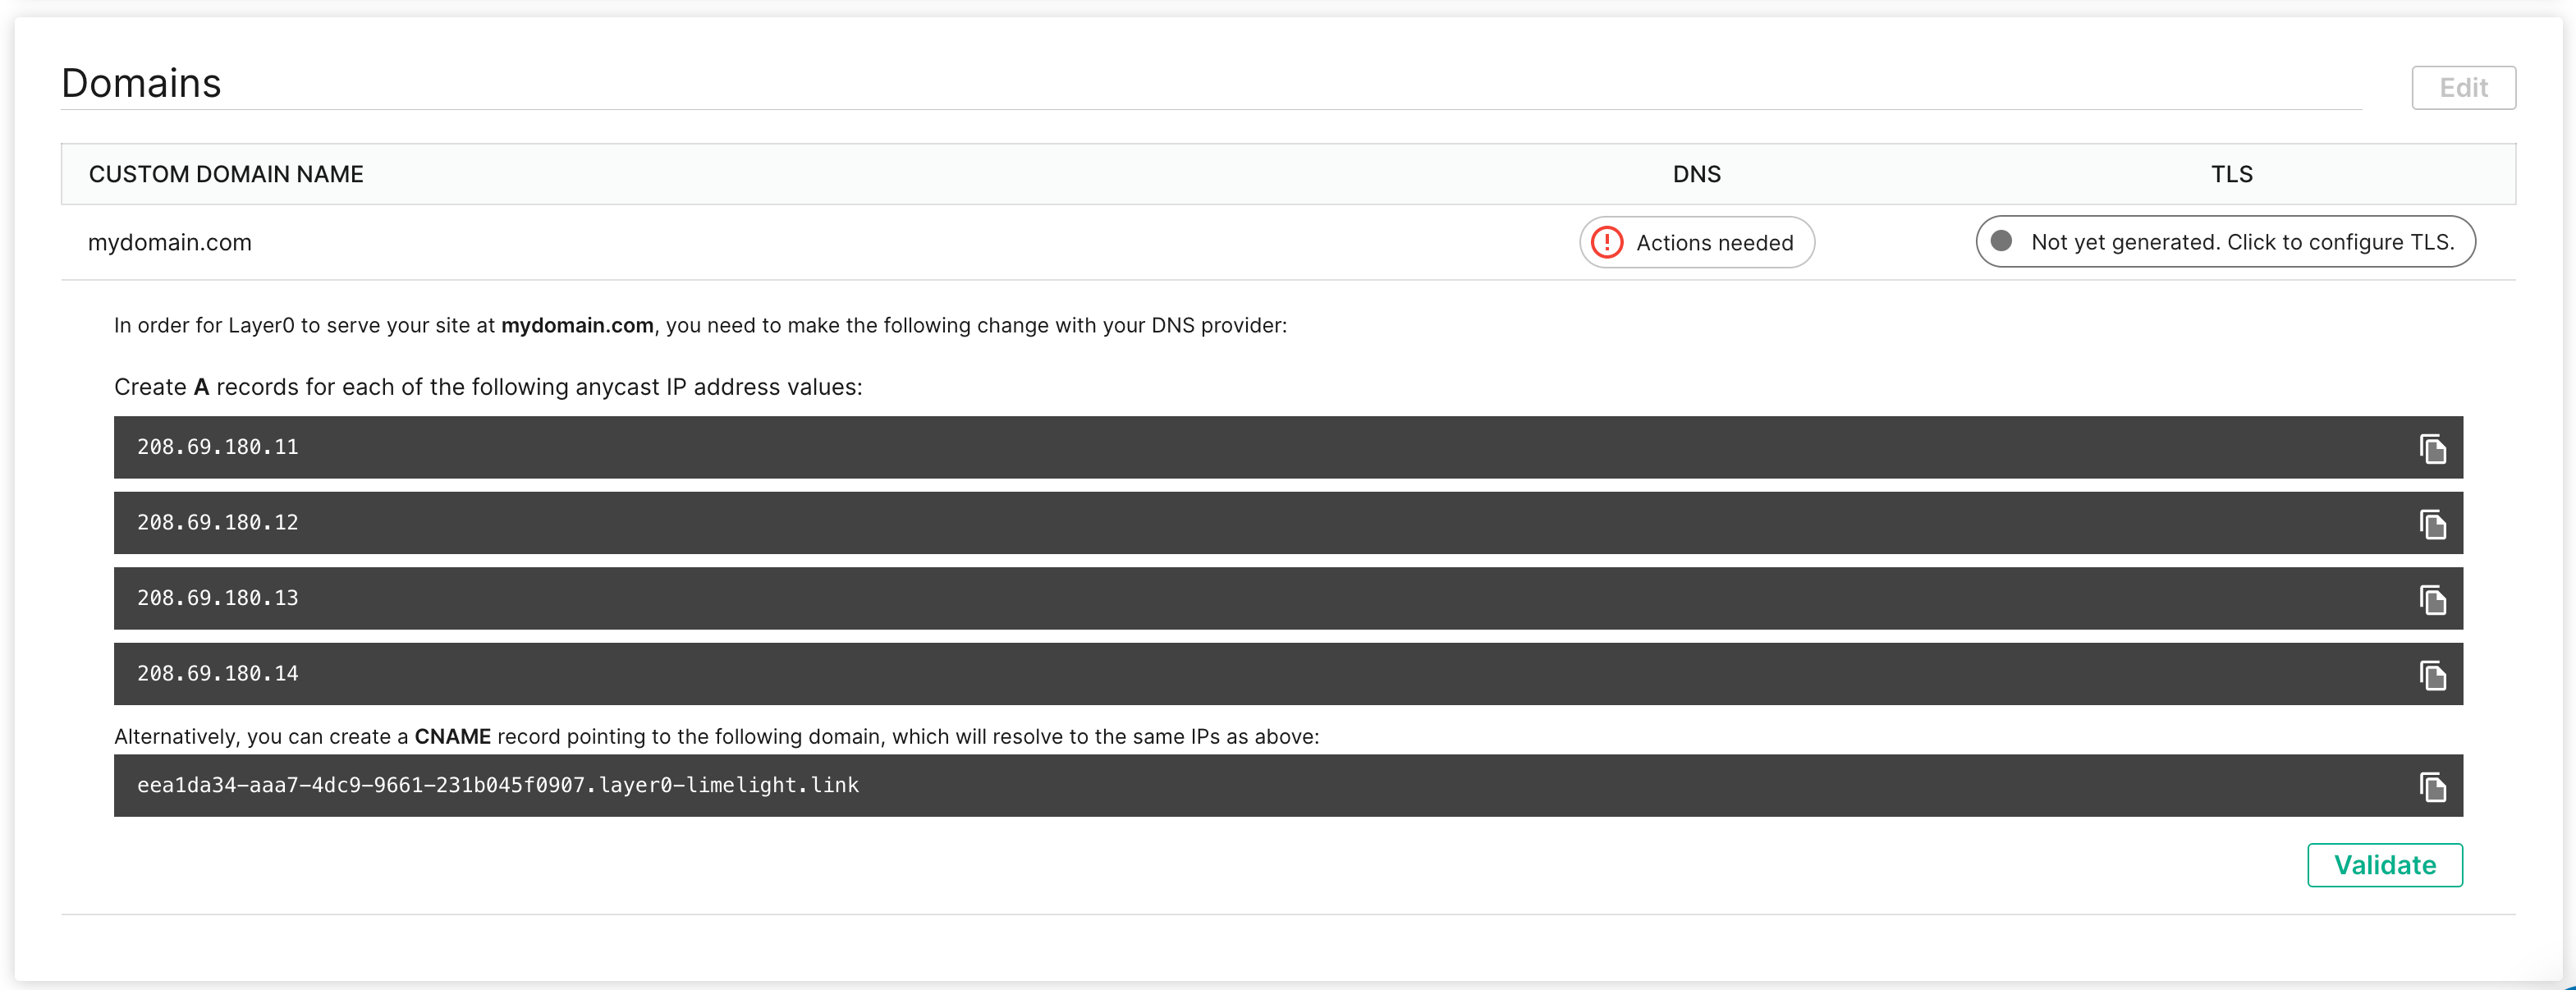
To see the DNS configuration values, click the Actions needed button in the Domains section of the Configuration tab. This will show you the A and CNAME records you need to create in your DNS provider.
Using a Sub-domain
To host your site on a subdomain (e.g. www.mywebsite.xyz), add a CNAME record with the value shown under DNS Configuration (see above).
1# To verify your DNS entry, run the following command2dig <your-sub-domain>34# Example5dig www.mywebsite.xyz67# Result8www.mywebsite.xyz. 599 IN CNAME d12ea738-71b3-25e8-c771-6fdd3f6bd8ba.layer0-limelight.link.
Using an Apex Domain
To host your site on the apex domain (e.g. mywebsite.xyz), create multiple A records on your apex domain, with the following Anycast IP address values: 208.69.180.11, 208.69.180.12, 208.69.180.13, 208.69.180.14
1# To verify your DNS entry, run the following command2dig <your-apex-domain>34# Example5dig mywebsite.xyz67# Result8mywebsite.xyz. 599 IN A 208.69.180.119mywebsite.xyz. 599 IN A 208.69.180.1210mywebsite.xyz. 599 IN A 208.69.180.1311mywebsite.xyz. 599 IN A 208.69.180.14
Using Both an Apex Domain and a Sub-domain
-
Create the multiple
Arecords with the IPs, on your apex domain (see above). -
Create a
CNAMErecord for your sub-domain, with the value of your apex domain.1# To verify your DNS entries, run the following command2dig <your-sub-domain>3# Example4dig www.mywebsite.xyz5# Result6www.mywebsite.xyz. 599 IN CNAME. mywebsite.xyz.7mywebsite.xyz. 599 IN A 208.69.180.118mywebsite.xyz. 599 IN A 208.69.180.129mywebsite.xyz. 599 IN A 208.69.180.1310mywebsite.xyz. 599 IN A 208.69.180.14
Allowing Edgio IP Addresses
Before going live, ensure that all Edgio IP addresses are allowed in the security layer in front of your origin and/or API servers. The IP addresses you need to allow can be found on the Allowlisting section under the Origin Security tab for your property. Note that each team may have their own set of IPs so these values cannot be copied from one team to another.

TLS/SSL
All data transmitted to and from your Edgio site must be secured with TLS (Transport Layer Security). TLS, also known as SSL (Secure Sockets Layer), is a cryptographic protocol to communicate securely over the Internet. TLS provides end-to-end data encryption and data integrity for all web requests.
Edgio provides a wildcard TLS certificate that covers the auto-generated domains that it assigns to your site (e.g [team]-[site]-[branch]-[version].layer0-limelight.link). You need to provide your own certificate for your site’s custom domains.
If you already have an existing certificate, you can use it by skipping ahead to the Uploading your Certificate section. Many customers who have existing certificates still choose to obtain a new one when adopting Edgio so as not to reuse the same private key with more than one vendor/system.
Obtaining a Certificate Automatically
Edgio can generate SSL Certificates on your behalf using Let’s Encrypt. Certificates are free, valid for 3 months, and automatically renewed as long as the technical requirements, shown below, remain met:
-
Make sure each environment is configured with the custom domains on which it will receive traffic. For more information on configuring custom domains, see Custom Domains above.
-
Using your DNS provider, verify and possibly add a
CAArecord to allow Let’s Encrypt to generate certificates for your domains.-
The CAA DNS entries of a domain behave like an allow list to indicate whether any or only certain Certificate Authorities are allowed to generate certificates for that domain.
-
If there are no CAA records, it means that any Certificate Authority is allowed to generate certificates for that domain.
-
If there are CAA records, it means that only certain Certificate Authorities are allowed to generate certificates for that domain.
-
So in order for Let’s Encrypt to be able to generate a certificate for your domains, you must either not have defined any CAA records, or Let’s Encrypt’s CAA entry must be among those defined in the list of CAA records.
You can verify the value of the CAA records for your domain from the command line using the command below.
Bash1# Run the following command2dig caa +short <your-apex-domain>34# Example5dig caa +short mywebsite.xyzExample of a CAA query showing that only certain Certificate Authorities are allowed to generate certificates for that domain:
Bash10 issue "amazon.com"20 issue "digicert.com"30 issue "globalsign.com"40 issue "letsencrypt.org"If the result of the CAA DNS query is empty, it means that any Certificate Authority is allowed to generate certificates on that domain. If so, you can directly go to the next step.
If there are already some CAA DNS entries defined on your domain, and if Let’s Encrypt’s CAA entry is not among those, you will have to add an additional CCA entry for Let’s Encrypt.
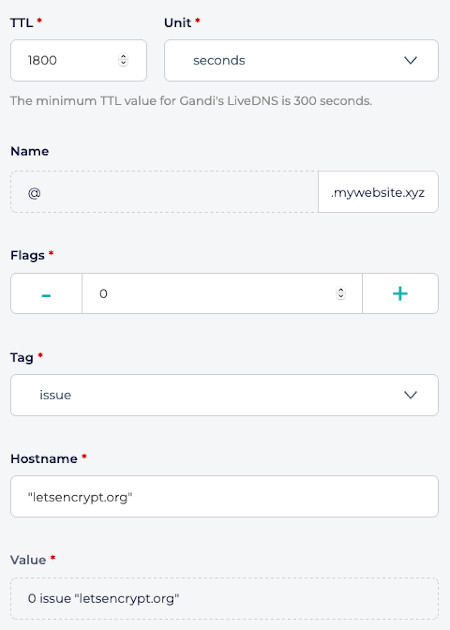
To do so, log into your DNS provider, and add a
CAAtype DNS record with the following values:- Type :
CAA - Name : empty (or
@, depending on the DNS provider) - Flags:
0 - Tag:
issue - Value:
letsencrypt.org(or"letsencrypt.org")
Example with GoDaddy:

Example with Gandi:
You can use the following links to see how to configure the CAA record on commonly used DNS providers:
- How to add a CAA record on Gandi
- How to add a CAA record on Godaddy
- How to add a CAA record on AWS
- How to add a CAA record on NameCheap
Once the DNS entry has been added, you can verify the CAA record using one of the following:
Many DNS providers have already added this
CAADNS record by default while some DNS providers do not allow the creation ofCAADNS records and therefore allow any Certificate Authority to generate certificates.You can learn more about CAA DNS records on Let’s Encrypt website, on Wikipedia, on Gandi and on eff.org
-
-
Add an
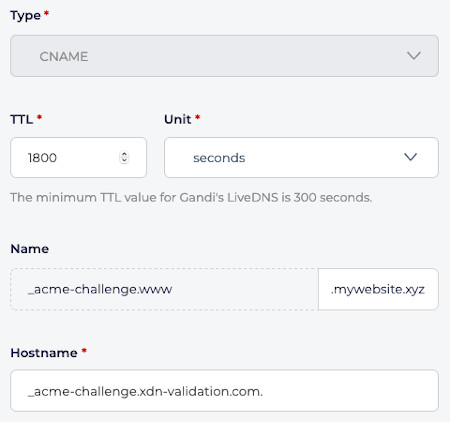
_acme-challenge.CNAME DNS entry to allow Edgio to issue a certificate request on your behalf.Log into your DNS provider and add one
CNAMEtype DNS entry with the value_acme-challenge.<your-domain-here>for each domain you use on your Edgio website. For example, if your domain ismywebsite.xyz, the DNS entry should have a value of_acme-challenge.mywebsite.xyz. This record should point to_acme-challenge.xdn-validation.com. Repeat the operation of each domain associated with your Edgio website.Example with Godaddy:

Example with Gandi:
Once the DNS entries have been added, you can use one of the following to verify that they are correctly configured:
You can also verify the CNAME records using the command line:
Bash1# Run the following 'dig' command to verify the presence of the '_acme-challenge.' CNAME :2dig +short cname _acme-challenge.<your-domain>34# For example:5dig +short cname _acme-challenge.mywebsite.xyzExpected result for the DNS query:
1_acme-challenge.xdn-validation.com.If you use multiple domains for your website, like
mywebsite.xyzandwww.mywebsite.xyz, you will have to make sure that the_acme-challengeDNS record has been added for both domains:1_acme-challenge.mywebsite.xyz -> _acme-challenge.xdn-validation.com.2_acme-challenge.www.mywebsite.xyz -> _acme-challenge.xdn-validation.com.If you have been previously using Let’s Encrypt to generate certificates for this domain, please verify that there are no remaining TXT records named
_acme-challenge.mywebsite.xyz.You can read more about the
acme-challenge.process by visiting Let’s Encrypt Website -
Once the requirements above are met, you can generate the certificate using the Edgio Developer Console:
-
Select your site and navigate to Settings > SSL Certificate
-
Verify the state of your certificate (you should see that there’s no certificate provided yet for your website):
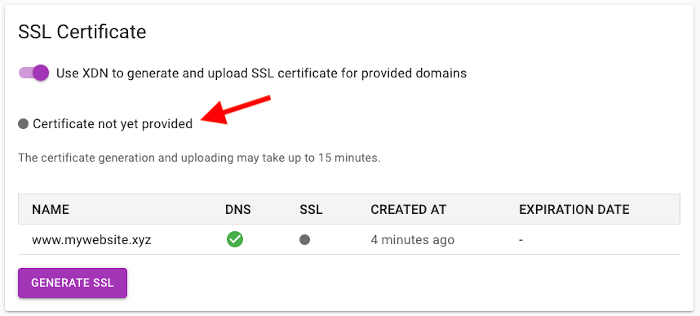
- Click on the Generate SSL Certificate button:
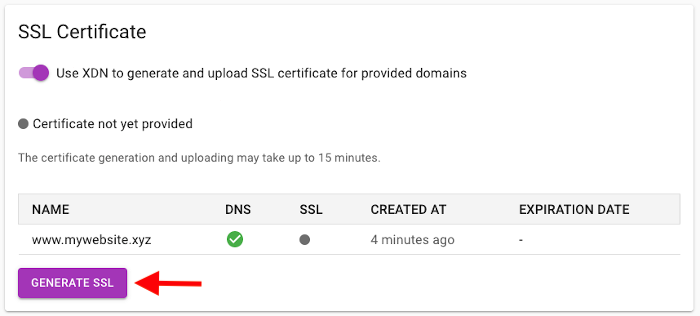
- After a couple of minutes, you should see that your website has received a valid certificate:
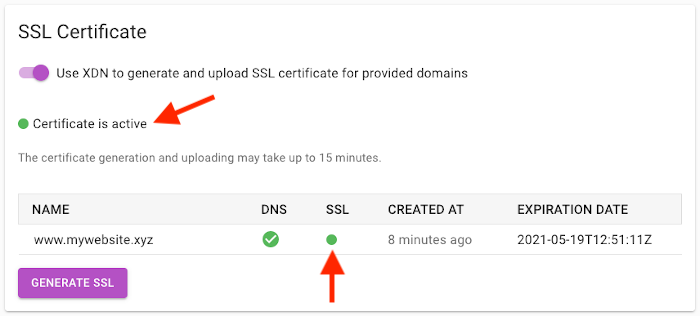
-
Creating a Certificate Manually
TLS certificates are issued by Certificate Authorities (CA) based on Certificate Signing Request (CSR) that they receive from you. Alongside the CSR the same process creates the certificate’s private key. You only need to share your CSR with CA, not the private key which you should store securely.
The following steps describe the creation of the CSR and private key with OpenSSL. OpenSSL is an open-source toolkit for the TLS protocol. We recommend using OpenSSL because it ensures that your private key will only be stored locally on your infrastructure. Your CA may have more customized guides or an entirely customized certification process.
To create CSR and private key do the following:
-
Open your terminal window and make sure that you have OpenSSL installed:
- On MacOS you can install it by using
brewpackage manager (e.g.brew install openssl) - On Windows you can install it by using
Chocolateypackage manager (e.g.choco install openssl) - On Linux/Unix you can install it by running the built-in OS package manager (e.g.
apt-get install openssl,apk add openssland so on)
- On MacOS you can install it by using
-
Go to the directory of your choice and create a configuration file
edgio.confbased on this template:1[req]2default_bits=20483distinguished_name = req_distinguished_name4req_extensions = v3_req56[req_distinguished_name]7countryName=Country Name (2 letter code)8countryName_default=US9stateOrProvinceName=State or Province Name (full name)10stateOrProvinceName_default=California11localityName=Locality Name (e.g. city)12localityName_default=San Francisco13organizationName=Organization Name (e.g. company)14organizationName_default=YourCompanyName15commonName=Fully Qualified Domain Name (FQDN) e.g. www.your-company-name.com16commonName_default=www.your-company-domain.com1718[ v3_req ]19subjectAltName=@alt_names2021[alt_names] # Other domains: apex domain, wildcard domain for staging and dev, and so on22DNS.1=*.your-main-domain.com23DNS.2=*.your-dev-domain.com24DNS.3=your-apex-domain.com25# And so on
Replace the country, state/province, locality, organization name and, most importantly Common Name (CN), for the cert which must be the fully qualified domain name for your domain (e.g. for Edgio that is www.edg.io)
You will want to add all the additional domains into the alt_names section. There you should add your development, staging and other domains although Edgio strongly encourages the use of wildcard certs.
- Run
openssl req -out edgio.csr -newkey rsa:2048 -nodes -keyout edgio.key -config edgio.conf -batch. This should generate your CSR inedgio.csrand private key inedgio.key. If you want OpenSSL to ask you for each different input, remove the-batchoption and re-run the command. - Verify your CSR contains the expected domains by running
openssl req -in edgio.csr -noout -text | grep DNS - Read the CSR (e.g.
cat edgio.csr) or copy to your clipboard (on OSXcat edgio.csr | pbcopy) and send it to your CA for certification.
Uploading Your Certificate
Prerequisites
To upload a certificate, you must have the Admin role on your team, and your team must be upgraded to Edgio Enterprise.
Edgio needs the following to correctly host your certificate:
- Certificate issued by CA
- Intermediate certificates (IC) used by CA, including CA’s signing certificate
- Private key that was generated at the time of the CSR.
Uploading the certificate
To upload your SSL certificate, do the following:
-
Navigate to the Settings tab on your site:

-
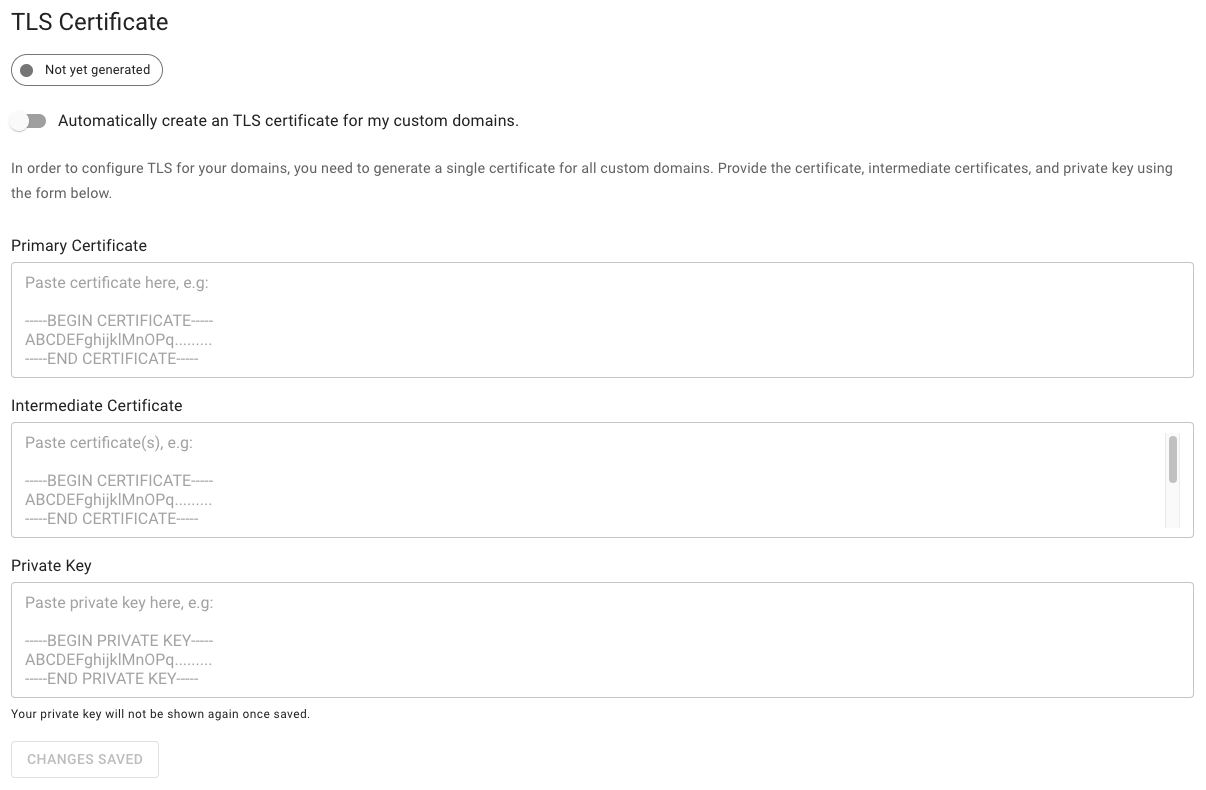
Scroll to TLS Certificate.
-
Toggle Automatically create an TLS certificate for my custom domains to the on position.
-
Copy the certificate, intermediate certificates, and the private key into the corresponding edit boxes.
The private key is non-public data and must not be shared with parties other than Edgio. Edgio stores your private key securely at rest. It is never shown in the developer console and only used to provision parts of the infrastructure that are used to terminate TLS connections.
-
Click CHANGES SAVED.
The certificate’s status becomes Activating:

After the certificate is activated, its status becomes Active:

_Note: Certificate activation should take just a few minutes. If the status does not become Active within an hour, please contact support. _

