


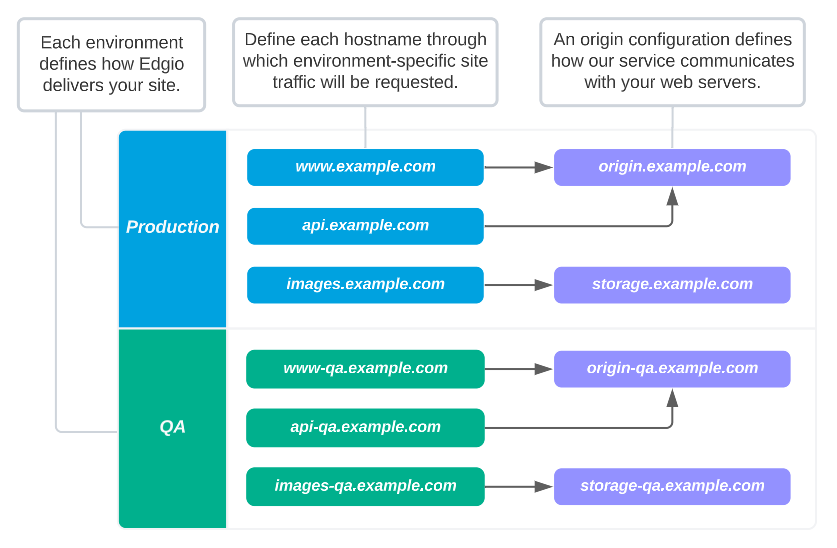
Setting up the delivery of your site through Edgio requires the following configuration for each desired environment:
- Hostname: Identifies a domain (e.g.,
cdn.example.com) through which your site will be served. - Origin: Defines how our service will communicate with your web servers.
Control how Edgio communicates with your web servers by mapping hostnames to origin configurations.
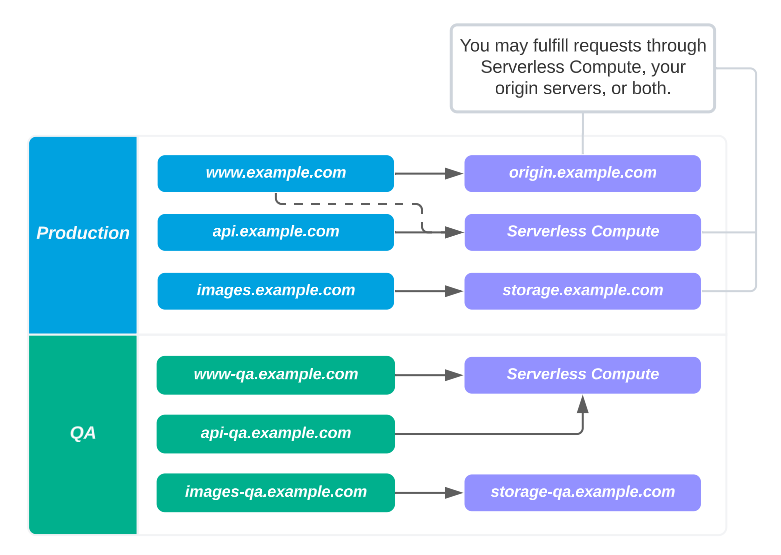
You may also serve your site through Serverless Compute. You may serve all of your site traffic through Serverless Compute, your origin server(s), or any combination of both.
Quick Start
Set up your hostnames and origins through the following steps:
-
Define each hostname through which your site’s content will be delivered.
-
Create an origin configuration that defines how Edgio communicates with your web server(s).
-
Configure your firewall to accept traffic from our network.
-
Edgio requires a TLS certificate hosted on our network to serve HTTPS traffic. You may either upload your own TLS certificate or you may allow Edgio to autogenerate it for each hostname defined in step 1 by performing the following steps:
-
Check for CAA records and verify that the Let’s Encrypt certificate authority is allowed to issue certificates for that hostname.
-
Add an _acme-challenge CNAME record that proves your control over that hostname.
Example:
_acme-challenge.cdn.example.com. CNAME _acme-challenge.xdn-validation.com.
-
-
Once you are ready to serve traffic on our CDN, use your DNS service provider to update the DNS record for each hostname defined in step 1 to point to our service.
Hostnames
On a per environment-basis, define each hostname that will be served through Edgio.
Key information:
-
Specify hostnames using lower-case letters.
-
Hostnames must be unique across all environments.
For example, if you have defined
www.example.comwithin theproductionenvironment, then you cannot define it within any other environment until you delete it from theproductionenvironment. -
Each hostname is mapped to an origin configuration. By default, Edgio proxies cache misses for that hostname to that origin configuration. You may override this mapping through your CDN-as-code configuration.
-
Each hostname requires the installation of a TLS certificate on our network. Edgio can automatically generate and install this TLS certificate when both of the following requirements are met:
-
Certificate Authority Authorization: The Let’s Encrypt certificate authority (CA) must be allowed to issue certificates for that hostname. It is allowed to issue certificates when either of the following conditions are true:
- A CAA record has not been issued for that hostname or a parent hostname. This DNS configuration means that any CA is allowed to generate certificates for that hostname.
- A CAA record explicitly allows the Let’s Encrypt CA to generate certificates for that hostname.
This sample CAA record indicates that the Let’s Encrypt CA is allowed to issue certificates for
cdn.example.com:cdn.example.com. CAA 0 issue "letsencrypt.org" -
Domain Control Validation: Prove your control over that domain by adding an
_acme-challengeCNAME record to it.Example:
_acme-challenge.cdn.example.com. CNAME _acme-challenge.xdn-validation.com.
Alternatively, you may upload your own TLS certificate.
-
-
Once you are ready to serve traffic through Edgio, update the hostname’s DNS configuration to point to our service.
To add, modify, or delete hostnames from an environment
-
Load the Hostnames page.
- From the Edgio Developer console, select the desired private or team space.
- Select the desired property.
- From the left-hand pane, select the desired environment from under the Environments section.
- From the left-hand pane, select Hostnames.
-
Perform one of the following steps:
-
Add a Hostname:
- Click + Add hostname.
- Add each desired hostname on a separate line.
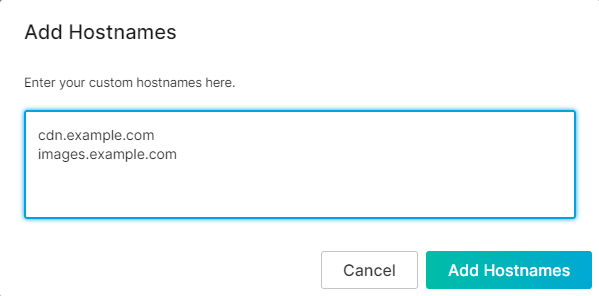
- Click Add Hostnames.
-
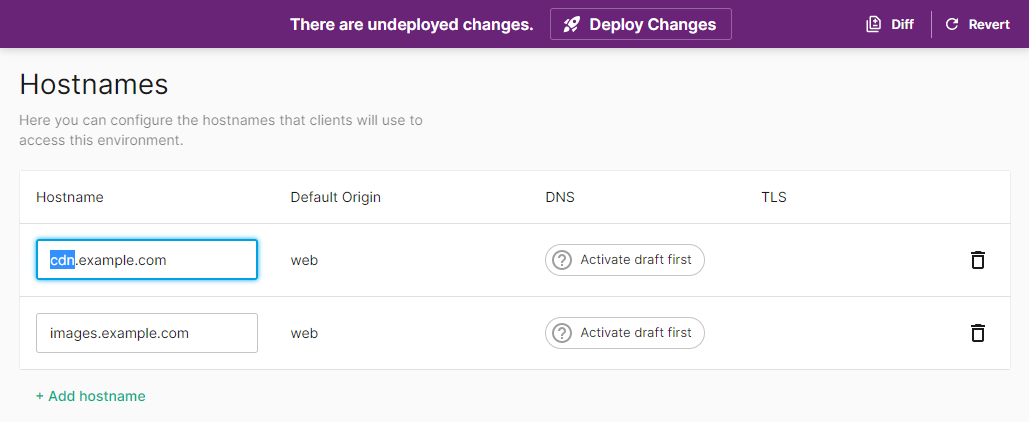
Assign an Origin: Map a hostname to a different origin by selecting the desired origin from under the Default Origin column.
The Default Origin column is read-only when the current property only contains a single origin configuration (e.g.,
web). -
Modify a Hostname: Modify an existing hostname by replacing the existing hostname with a new value.
-
Delete a Hostname: Click
 next to the hostname that should be deleted.
-
-
Repeat step 2 as needed.
-
If you are finished making changes to this environment, click Deploy Changes.
Origin
On a per environment-basis, define how Edgio will communicate with your origin server(s).
Key information:
-
Each origin configuration identifies a set of web server(s) by hostname or IP address.
-
An origin configuration may identify up to 10 hostnames or IP addresses.
-
The maximum number of origin configurations per environment is 100.
-
It is strongly recommended to cloak your origin to protect it against attacks that directly target your web servers and thereby bypass the security provided by our service.
-
You may configure an origin configuration to always serve traffic to your hosts over HTTP, HTTPS, or to match the client’s scheme. Matching a client’s scheme means that our network will serve HTTP traffic to your web servers over port 80, while HTTPS traffic will be served over port 443.
-
You may enable Server Name Indication (SNI) on an origin configuration to allow Edgio to use it during the TLS handshake. If the SNI hint is not found, then your origin server’s implementation determines the TLS certificate that will be returned.
Additionally, our service will compare the hostname used for the SNI hint to the certificate’s Subject Alternative Name (SAN) or Common Name (CN) during the TLS handshake. If the hostname does not match, then we will respond with a
502 Bad Gatewayresponse. -
By default, our network disables delivery when we detect a self-signed certificate from the origin server during the TLS handshake. Enable the Allow Self-Signed Certs option to require our edge servers to respond with a
502 Bad Gatewayresponse upon detecting a self-signed certificate from the origin server during the TLS handshake. -
Register the SHA-256 digest for the public key of your end-entity (i.e., leaf) certificate within the Pinned Cert(s) option. After which, our edge servers will respond with a
502 Bad Gatewayresponse when the SHA-256 digest for the public key detected from the origin server does not match one of the pinned certificates.
To add an origin configuration
-
Load the Origins page.
- From the Edgio Developer console, select the desired private or team space.
- Select the desired property.
- From the left-hand pane, select the desired environment from under the Environments section.
- From the left-hand pane, select Origins.
-
Click + Add Origin.
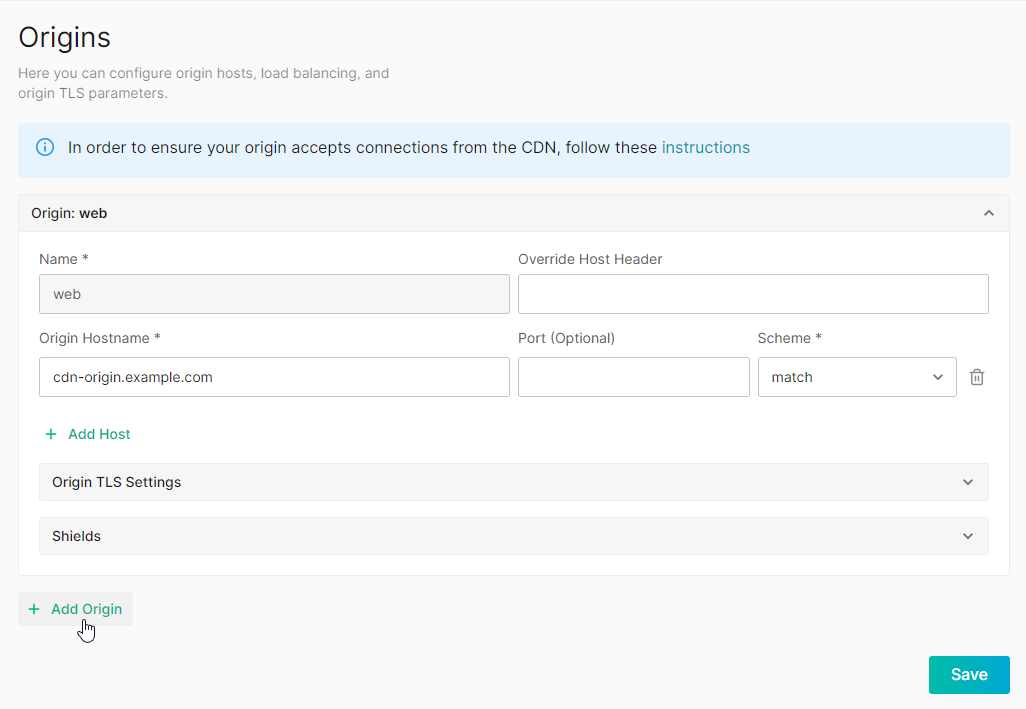
-
In the Name option, assign a name to this origin configuration. This name should only consist of alphanumeric characters, hyphens, periods, and underscores.
We recommend a unique, descriptive name to help you quickly map hostname(s) to this origin configuration.
-
Define one or more host(s). Each host determines how Edgio will communicate with your web server(s).
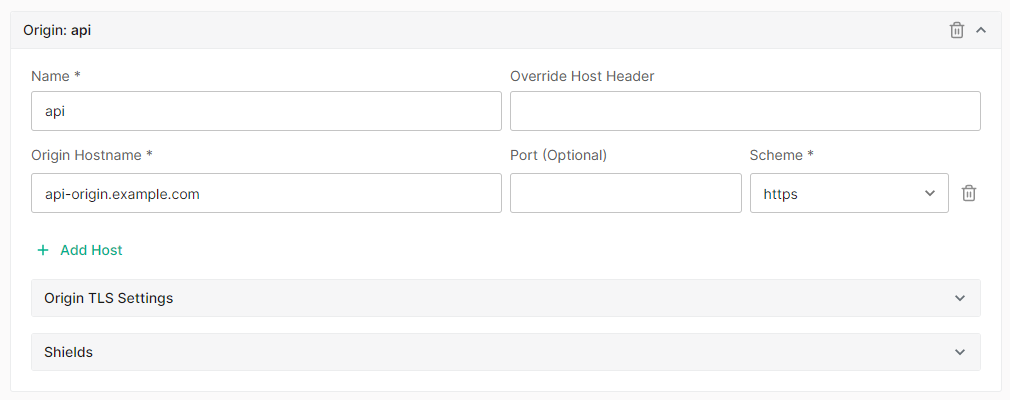
- In the Origin Hostname option, type a hostname or IP address that points to your web server(s).
- Optional. Set the Port option to the port over which our network will serve traffic to the above hostname or IP address.
- Set the Scheme option to always serve traffic to your hosts over HTTPS, HTTP, or to match the client’s scheme.
- Optional. Override the client’s
Hostheader by setting the Override Host Header option to the desired hostname.
This option forces our CDN to set the
Hostheader to the specified hostname whenever it proxies traffic to this origin configuration.- Optional. Add another host to this origin configuration by clicking + Add Host and then performing steps 4.1 - 4.4.
-
Optional. Define TLS settings for this origin configuration. Click on the Origin TLS Settings section to expand it.
- Enable SNI by toggling the Use SNI option to the on position (
 ) and then defining the hostname that will be sent as a SNI hint during the TLS handshake.
Upon enabling SNI, our service will perform a strict check using this hostname against the certificate’s Subject Alternative Name (SAN) or Common Name (CN) during the TLS handshake.
-
If your origin servers use a self-signed certificate, then you should toggle the Allow Self Signed Certs option to the on position (
). -
Set up certificate pinning by adding one or more public keys.
- Click + Add Pin.
- Paste the SHA-256 digest for the public key of your leaf certificate.
- Repeat steps 1 and 2 as needed.
- Enable SNI by toggling the Use SNI option to the on position (
-
Optional. Protect your origin by defining one or more shield POP(s). Click on the Shields section to expand it.
-
Assign a POP location to the region closest to your web server(s).
Upon configuring a region, all other regions will be updated from
Bypassto the selected POP. This configuration means that cache misses from all regions will be proxied to the selected POP location.
-
Optional. Assign a POP location to a different region.
Upon configuring a second region, the remaining regions are automatically updated from the selected POP to
Use the shield with the lowest RTT. This configuration means that cache misses from the remaining regions will be proxied to the shield POP that will provide the best performance.For example, the following configuration may potentially allow cache misses from the APAC region to be served through the shield location defined for the US West region (i.e.,
OXR).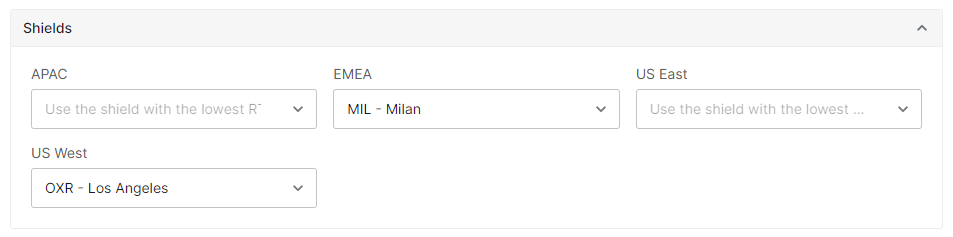
-
Optional. Repeat step 2 as needed.
-
Optional. Configure cache misses from a specific region to always be proxied to your origin by selecting
Bypass.
-
-
If you are finished making changes to this environment, click Deploy Changes.
Firewall - Allowing Edgio IP Addresses
As clients request your site, Edgio sends traffic through our network to the servers associated with your origin configuration(s). You must configure your firewall to allow this traffic to ensure that these requests are not blocked.
IP blocks may vary by team.
If you plan on using the Edgio CLI to deploy to a development or CI/CD environment, then you will also need to allow traffic from the domain to which it connects. This domain is listed within the Allowlisting window.
To view our network’s IP blocks
-
Load the Origins page.
- From the Edgio Developer console, select the desired private or team space.
- Select the desired property.
- From the left-hand pane, select the desired environment from under the Environments section.
- From the left-hand pane, select Origins.
-
From the information bar at the top of the page, click instructions.

The Allowlisting window will display a list of IPv4 and IPv6 blocks for standard traffic, a list of IP blocks for Serverless Compute, and the domain to which the Edgio CLI connects when deploying to a development or CI/CD environment.
We strongly recommend that you allow traffic for all IP blocks and the domain listed on the Allowlisting window.
Serving Traffic through Edgio
Once you are ready to serve traffic through Edgio, you will need to configure DNS for each hostname. DNS configuration consists of defining a CNAME record that points your hostname to our service.
From your DNS service provider, point your hostname(s) to a service domain that is either specific to your property’s environment or space.
Sample Service Domain: 2af36ae6-2146-4b73-a5e7-f86c4a93bc06.edgio.link
Environment-Specific Service Domain
Edgio assigns a different service domain to each of your environments. You may point any hostname defined within a specific environment to its service domain.
To view the service domain assigned to a specific environment
-
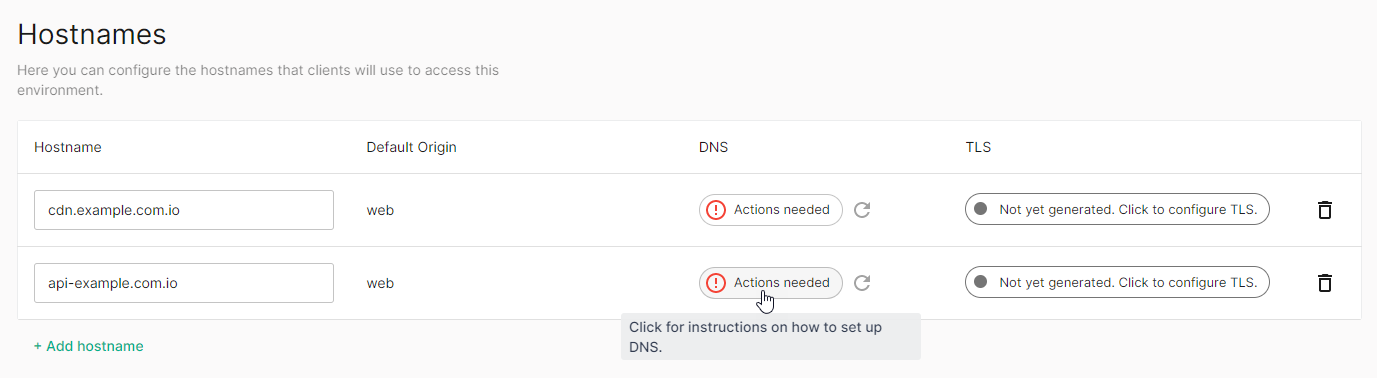
Load the Hostnames page.
- From the Edgio Developer console, select the desired private or team space.
- Select the desired property.
- From the left-hand pane, select the desired environment from under the Environments section.
- From the left-hand pane, select Hostnames.
-
From the DNS column, click Actions needed.
-
From the DNS Configuration pane, click
 to copy this domain.
Space-Specific Service Domain
Edgio assigns a different service domain to:
- Your private space.
- Each team space to which you belong.
You may point any hostname defined within a space to its service domain.
To view the service domain assigned to a space
-
Load the space’s Settings page.
- From the Edgio Developer console, select the desired private or team space.
- Click Settings.
-
From the Team DNS Configuration section, click
to copy this domain.
DNS Verification
Once you have updated your DNS configuration, run the following command to verify it:
dig <HOSTNAME>
Example: The following example demonstrates how to verify the DNS configuration for cdn.example.com:
1> dig cdn.example.com23# Result4cdn.example.com. 599 IN CNAME 2af36ae6-2146-4b73-a5e7-f86c4a93bc06.edgio.link