


Rules determine how requests for a specific environment will be processed.
Common Uses:
- Define when requests will be prefetched.
- Override or define a custom cache policy.
- Secure or deny requests for sensitive content.
- Redirect requests.
- Store custom log data.
Quick Start
Set up your rules through the following steps:
- Identify the environment (e.g.,
production) that will be configured. - Define one or more rule(s) for that environment. Each rule should contain at least one feature.
- Apply your rules to that environment by deploying your changes.
Rules and CDN-as-Code
There are two basic workflows for defining your CDN configuration:
- Generate and deploy rules through the Edgio Developer console.
- Define a CDN-as-Code configuration and then deploy it through the Edgio CLI.
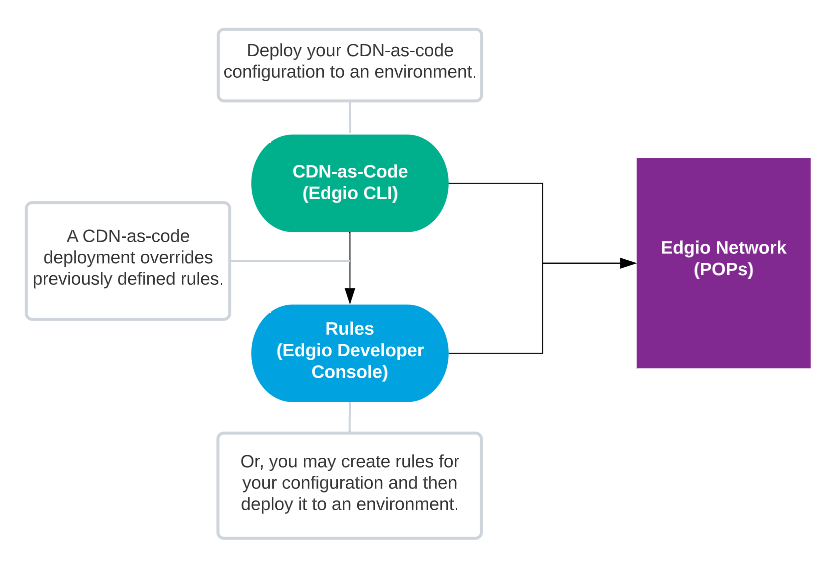
You may override a CDN-as-code configuration through the Rules page. However, complex CDN-as-code configurations are displayed in JSON format instead of being displayed as rules. Additionally, any future CDN-as-code deployments will override your rules.
Rules
A rule:
-
Identifies a set of requests through conditions.
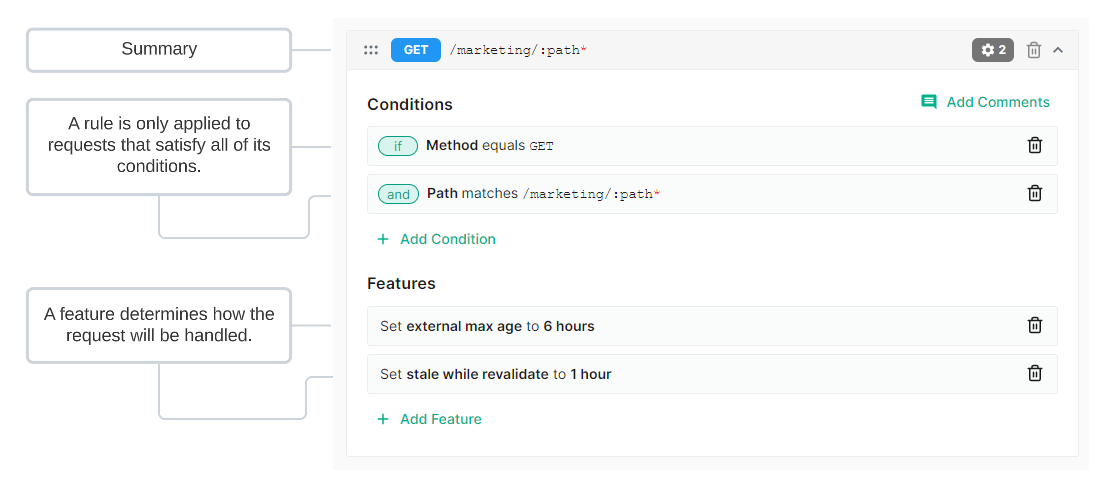
A rule is only applicable to requests that satisfy all of its conditions. By default, a new rule applies to all requests since it does not contain conditions.
-
Defines how requests will be processed through features. A feature identifies an action and how it will be applied to requests.
For example, the following rule applies a caching policy to all GET requests whose relative path starts with /marketing/.
Conditions
A condition identifies a set of requests. Setting up a condition requires:
-
Selecting the type of condition.
For example, you may identify requests by HTTP method, path, or request headers.
-
Defining how a request will be compared against a value or state. In some cases, this involves selecting an operator and defining the value that will be compared against the request.
Example:
Identify all GET requests through the following condition:
- Type of condition (aka variable): Method
- Operator: Equals
- Match Value: GET
Learn more about types of conditions.
Operators
An operator determines when a request satisfies a condition by defining the relationship between a variable and a value. Each operator is briefly described below.
-
equals: Indicates that the value derived from the request must be an exact match to the value defined within a condition.
A comparison will be performed against the exact value defined within the condition. The only exception occurs for the
%symbol. This symbol represents a URL-encoded character (e.g.,%20represents a space character).Example:
The following request will result in a match when the
Query Stringcondition is set tomedia\'*':http://cdn.example.com?media\'*' -
does not equal: Indicates that the value derived from the request must be different from the value defined within a condition.
A comparison will be performed against the exact value defined within the condition. The only exception occurs for the
%symbol. This symbol represents a URL-encoded character (e.g.,%20represents a space character).Example:
The following request will result in a match when the
Query Stringcondition is set tomedia\'*':http://cdn.example.com?type=media\video -
matches (simple): Indicates that the value derived from the request must match the pattern defined within a condition. You may define a pattern using our route path syntax.
The intended use for this operator is to create a pattern for a URL path. For all other patterns, our recommendation is to use the
matches regular expressionoperator.Example:
The following request will result in a match when the
Pathcondition is set to/shows/:id:http://cdn.example.com/shows/5309 -
matches regular expression: Indicates that the value derived from the request must match a Perl-compatible regular expression defined within the Match Value option.
Regular expressions define a pattern that will be searched for within a text value. Regular expression notation defines specific meanings to a variety of symbols. Information on how special characters are handled within a regular expression is provided below. This information is not meant to be a comprehensive guide on regular expression usage or syntax.
-
’/’: A forward slash is treated as a literal character instead of a special regular expression character. Do not escape it.
-
\: A backslash in a regular expression typically:-
Defines a shorthand character class (e.g.,
\dinstead of[0-9]). -
Escapes the character that follows it. This causes that character to be treated as a literal value instead of taking on its regular expression meaning.
For example, the following syntax escapes an asterisk:
\*A single backslash is always ignored when defining a regular expression for a match condition. Contact our customer support team if you would like to escape a special character when defining a regular expression for a match condition.
-
-
%: The meaning of a percentage symbol depends on its usage.%{<HTTP VARIABLE>}:This syntax identifies an HTTP variable.%{<HTTP VARIABLE%PATTERN>}:This syntax uses a percentage symbol to identify an HTTP variable and as a delimiter.\%:Escaping a percentage symbol allows it to be used as a literal value or to indicate URL encoding (e.g.,\%20).
-
*: An asterisk allows the preceding character to be matched zero or more times.
-
<SPACE>: A space character is typically treated as a literal character. -
': Single quotes are treated as literal characters. A set of single quotes does not have special meaning.
Example:
The following request will result in a match when the
Pathcondition is set to/shows/[0-9]+:http://cdn.example.com/shows/5309 -
-
does not match regular expression: Indicates that the value derived from the request must not match a regular expression.
Example:
The following request will result in a match when the
Pathcondition is set to/shows/[0-9]+:http://cdn.example.com/shows/cdn-detectives -
in: Indicates that the value derived from the request must be an exact match to the one of the value(s) defined within a condition.
Add a value by typing it and then pressing
ENTER. Remove a value from the list by clicking thexicon that appears directly to the right of it. A sample list item is shown below.
-
not in: Indicates that the value derived from the request must not be an exact match to the one of the value(s) defined within a condition.
Add a value by typing it and then pressing
ENTER. Remove a value from the list by clicking thexicon that appears directly to the right of it. -
less than: Indicates that the value derived from the request must be less than the value(s) defined within a condition.
-
less than or equal: Indicates that the value derived from the request must be less than or equal to the value(s) defined within a condition.
-
greater than: Indicates that the value derived from the request must be greater than the value(s) defined within a condition.
-
greater than or equal: Indicates that the value derived from the request must be greater than or equal to the value(s) defined within a condition.
Features
A feature determines how requests will be processed. They are categorized as follows:
- Access: Controls access to content.
- Caching: Customizes when and how content is cached.
- Client: Controls how the client communicates with our CDN.
- Comment: Adds a note or metadata to your configuration. This feature is solely informational and does not affect your configuration.
- Headers: Adds, modifies, or deletes headers from the request or response.
- Logs: Customizes how log data is stored.
- Origin: Controls how the CDN communicates with an origin server.
- Response: Customizes the response sent to the client and determines whether we will allow prefetching instructions to be sent to the client.
- Set Variables: Assigns a value to one or more user-defined variable(s) that are passed to your bespoke traffic processing solution.
- URL: Redirects or rewrites requests to a different URL.
Rule Precedence
You may create multiple rules. The use of multiple rules facilitates:
- The setup of a default configuration that will be applied to all requests.
- The creation of rules that specialize according to request type or behavior.
- Additional control over how requests for content are handled.
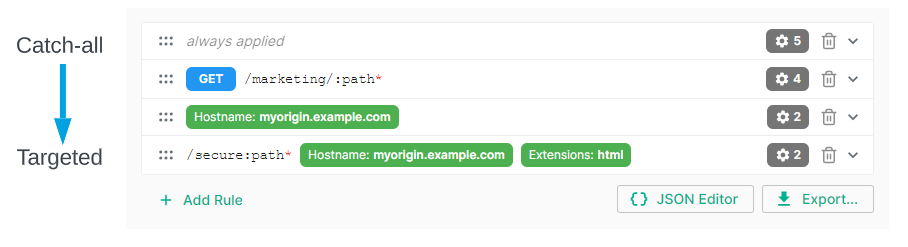
Rules are typically processed in the order that they are listed. If a request satisfies the criteria for multiple rules, then all of the features associated with those features will be applied to the request. This could lead to a situation where conflicting actions will take place. In such a case, the last action to take place will take precedence over previous actions. Therefore, it is recommended to place rules that should take precedence as close to the bottom of the list as possible.
Move a rule by dragging the rule’s ![]() icon to the desired position.
icon to the desired position.
A good rule of thumb when determining where a rule should be positioned is to order rules according to the level of detail in the criteria. Rules with general criteria should be placed closer to the top of the list, while more detailed criteria should be placed closer to the bottom. This type of configuration allows catch-all rules to assign default handling behavior for your assets without interfering with the manner in which specific types of assets are handled.
Exceptions to Rule Precedence
The following cases are exceptions to the order-based rule precedence stated above:
-
Identical Matching Criteria: If multiple rules share the same matching criteria, then the actions associated with those rules will take place at the same time. Thus, a rule at the bottom could be combined with a rule at the top of the list. This type of situation would prevent the rule at the bottom from taking precedence over other rules.
-
URL Rewrite Precedence: The URL Rewrite feature takes precedence when multiple features will be applied to a request. This occurs regardless of rule order.
Example:
In this sample scenario, a policy contains two rules. The first rule applies the URL Redirect feature, while the second one applies the URL Rewrite feature. If a request satisfies both rules, then the URL Rewrite feature will always be applied to a request before the URL Redirect feature.
-
Token Auth Precedence: The Token Auth feature takes precedence over most features with the exception of the URL Rewrite feature. This occurs regardless of rule order.
Sample Scenario
In this sample scenario, create the following rules:
| Order | Purpose | Description |
|---|---|---|
| 1 | Assign a default cache policy for all requests. | Placing this rule at the top of the list ensures that this cache policy is assigned by default to all requests. |
| 2 | Define an alternative cache policy based on origin type. | The rule’s position allows it to override the default behavior defined in the first rule for requests to a specific origin. |
| 3 | Deny access based on the requester’s location. | This rule denies access for requests that originate from a specific location. Although this rule does not contradict the above two rules, segregating these instructions improves readability and facilitates rule management. |
Rule order can drastically affect how requests are handled. In the above example, moving the default cache policy rule below the other rules will nullify the cache policy defined by origin type.
Managing Rules
You may create, modify, and delete rules.
Key information:
-
You may only administer rules when you are in draft mode. If you are in read-only mode, you may enter draft mode by clicking Edit v#.
-
Draft mode allows you to make changes without affecting an environment’s traffic. This allows you to collaborate with other team members when setting up rules and to stage changes until they are needed.
For example, a sales event may require URL redirects or a different caching policy than standard site traffic. You can stage these changes until they are needed for the sales event.
-
Apply your changes to the current environment by clicking Deploy Changes.
-
Add a comment or a note to a rule by clicking Add Comments and then typing the desired message. Comments or notes are informational and do not affect your configuration.
-
An alternative method for setting up your configuration is CDN-as-code. CDN-as-code is a developer-oriented solution that provides more flexibility during CDN setup. You may create a base CDN-as-code configuration by setting up your rules through the Edgio Developer console, exporting them as EdgeJS code, and then pasting that code into your
routes.[js|ts]file.The Rules page will display a complex CDN-as-code configuration in JSON format. You may modify the JSON directly within the Rules page or your
routes.[js|ts]file.
To set up rules
-
Load the Rules page.
- From the Edgio Developer console, select the desired property.
- From the left-hand pane, select the desired environment from under the Environments section.
- From the left-hand pane, select Rules.
-
If you are in read-only mode, click Edit v#
-
Add a rule by clicking + Add Rule.
-
Add a condition that defines the set of requests for which this rule will be applied. Repeat this step as needed.
- Click + Add Condition.
- From the Variable option, select the method by which requests will be identified.
- From the Operator option, define the relationship between the variable selected in the previous step and the value that will be defined in the next step.
- In the Match Value option, define a value that will be compared against for each request.
- Click Add Condition.
-
Add a feature that determines how the requests defined in the previous step will be processed. Repeat this step as needed.
- Click + Add Feature.
- From the Feature Type option, select the category that best corresponds to the desired feature.
- From the Feature option, select the desired feature.
- Configure the selected feature.
- Click Add Feature.
-
Add more rules as needed by repeating steps 5 - 7.
-
Review your rules to verify how requests will be handled and the order in which rules will be applied to requests.
Move a rule by dragging the rule’s
 icon to the desired position.
 -
Click Deploy Changes.
To delete a rule
- Load the Rules page.
- From the Edgio Developer console, select the desired property.
- From the left-hand pane, select the desired environment from under the Environments section.
- From the left-hand pane, select Rules.
- Click the
 icon next to the desired rule.
 - Confirm the deletion by clicking Delete Rules.
To export your rules as EdgeJS code
- Load the Rules page.
- From the Edgio Developer console, select the desired property.
- From the left-hand pane, select the desired environment from under the Environments section.
- From the left-hand pane, select Rules.
- Click Export and then select EdgeJS to display your rules as a CDN-as-code (EdgeJS) configuration.
- Copy the code by clicking the
 icon.
icon. - Optional. Paste your code into your
routes.[js|ts].
Deploying your CDN-as-code configuration through the Edgio CLI will overwrite your rules. Likewise, deploying rule changes from the Edgio Developer console will override a previously deployed CDN-as-code configuration.