


You can also use traffic splitting for A/B Testing.
Edgio makes it easy to conduct A/B testing without performance penalties by executing splits at the edge through an easy-to-use yet powerful interface. A/B Testing, also known as split testing, is a marketing experiment wherein you split your audience to test a number of variations of canary deploys, blue-green tests, iterative migration off of a legacy website, personalization, and more.
Iterative site migrations allow you to mitigate risk as you migrate a site. You can recover quickly if there is an error and ensure that you do not experience downtime during the migration.
This guide provides an overview of site migrations and explains how to configure traffic splitting across multiple sites.
This guide uses the terms legacy and new to refer to your current and new sites as well as the related Edgio environments.
Configurations Entities
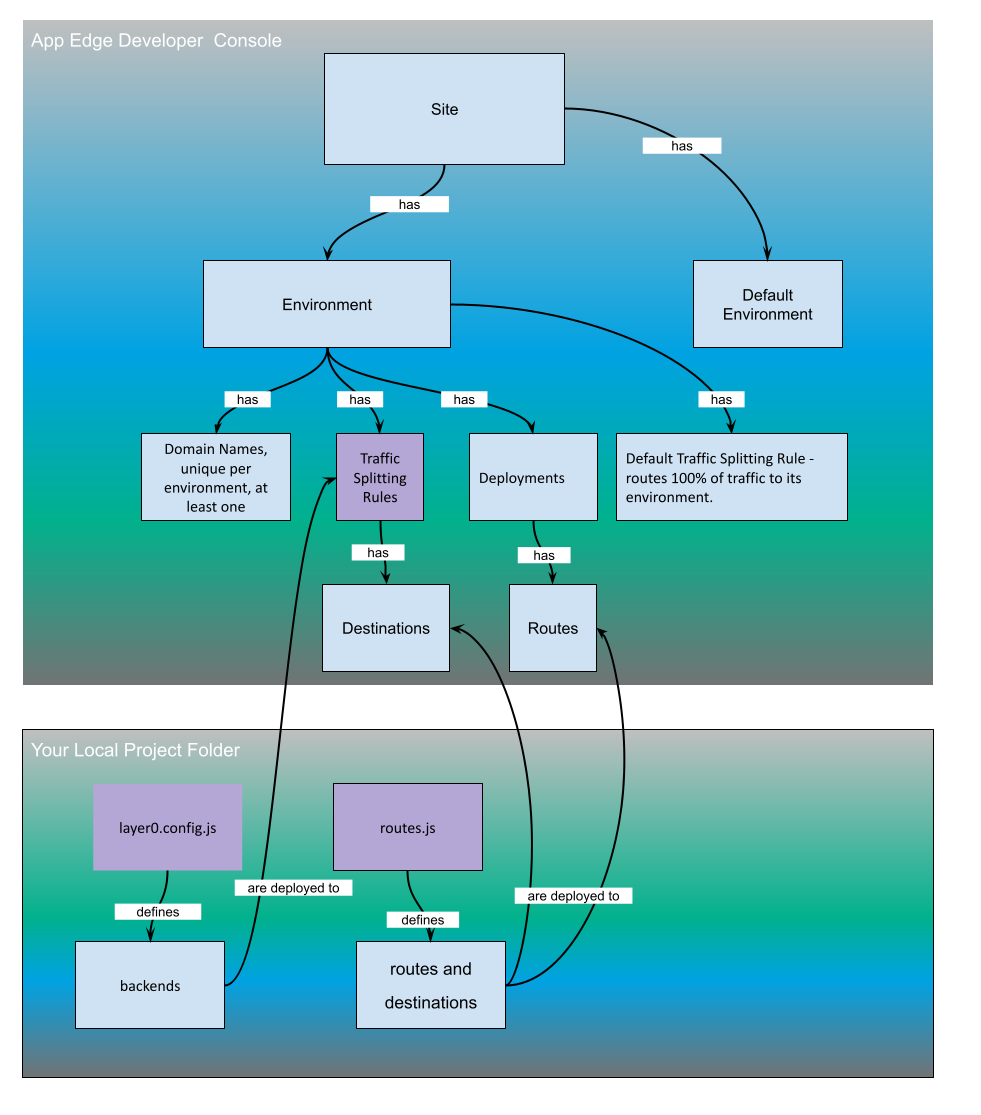
Traffic splitting requires that you make configurations in your project folder and create traffic splitting rules in the Edgio Developer console. The entities in the Console and files in your project folder where various configurations reside are called out. To provide a bigger picture, additional Console entities are included.
Types of Site Migrations
The two general types of iterative site migrations are gradual migrations and gradual site build-outs.
-
Gradual migrations: You have a legacy site and a new site with some kind of changes and improvements. You want to gradually move traffic from the legacy site to the new site. This allows you to verify items such as load on the new site, core web vitals, and so on. For example, if you want to begin migration on a Monday and finish on Friday, you could do something like this hypothetical situation:
- On Monday configure 20% of traffic to the new site and 80% to the legacy (old).
- On Wednesday configure a 50%/50% split.
- On Friday configure 100% of the traffic to the new site and remove all traffic from the legacy site.
-
Gradual site build-outs: You are replacing your legacy site with a new site that you are building/testing/deploying one piece at a time based on domains or routes, and so on. For example, you might have updated a single page or even an image and you want to publish the new item.
You are ready to roll out the first piece.
- You shift all traffic for that piece from the legacy site to the new by configuring 0% for the legacy and 100% for the new.
- As new pieces are ready, you do the same for them.
- When all pieces have been deployed you remove traffic from the legacy site.
Migrating Sites - General Steps
Separate Sites
Although there are several ways you might organize your sites for migration, we will focus on a common, simple scenario where the two sites are defined by two distinct environments. One environment is a proxy to the legacy site and the other is the new site.
- Configure the backends in the
edgio.config.jsfile. - Configure destinations in the
routes.jsfile. - Configure traffic splitting rules in the Edgio Developer console.
Separate Code Versions
If you are using two code versions you can use Continuous Integration/Continuous Deployment (CI/CD) to push changes to your new and legacy sites. Regardless of whether your versions reside in branches in the same repository or two different repositories, or some other way of separating your code, we recommend that you:
-
Create environments called
newandlegacyin the Edgio Developer console. -
Configure CI/CD to deploy to the
neworlegacysite whenever you push changes. Integrate either of these commands in your deployment script as appropriate:0 deploy –environment=new0 deploy –environment=legacy -
Configure the destinations in the
routes.jsfile, -
Configure traffic splitting rules in the Edgio Developer console.
Step 1. Configuring Backends
If your sites consist of two separate servers use these steps to configure the domain names. Servers are commonly your own origin servers, but can also be third-party servers for which you can use Edgio to proxy to the domain name, and use the Edgio router to configure caching and other header manipulation.
If your sites are defined by different code versions, this step is not necessary.
Configure the backends in the edgio.config.js file. (See edgio.config.js for more information.). For example, to split traffic between a new experience hosted on origin.my-site.com and a legacy experience hosted on legacy-origin.my-site.com:
1module.exports = {2 backends: {3 legacy: {4 domainOrIp: 'legacy-origin.my-site.com',5 },6 new: {7 domainOrIp: 'origin.my-site.com',8 },9 },10};
Step 2. Configuring Destination Environments
Add a destination for each site or application version to your routes.js file. The destinations will appear in the Edgio Developer console and you will use them later on when configuring traffic splitting rules.
1const {Router} = require('@edgio/core/router');2module.exports = new Router()3 .destination(4 'legacy_experience', // displayed in the destination dropdown in the traffic splitting section of your environment configuration in the Edgio Developer console5 new Router()6 // additional routing rules for the legacy experience go here7 .fallback(({proxy}) => proxy('legacy'))8 )9 .destination(10 'new_experience', // displayed in the destination dropdown in the traffic splitting section of your environment configuration in the Edgio Developer console11 new Router()12 // additional routing rules for the new experience go here13 .fallback(({proxy}) => proxy('new'))14 );
After deploying a router with multiple destinations, all requests will be sent to the first destination until you have defined traffic splitting rules within the Edgio Developer console.
Step 3. Configure Traffic Splitting Rules in the Edgio Developer console
-
Log into your account, then navigate to the environment in which you want to configure the iterative migration and click Edit:

-
Scroll to the Split Testing section and click Add Rule:

-
Select the amount of traffic to send to each destination or environment:
-
Click ADD DESTINATION.
-
Choose a destination from the drop-down menu and enter a percentage for each destination.

-
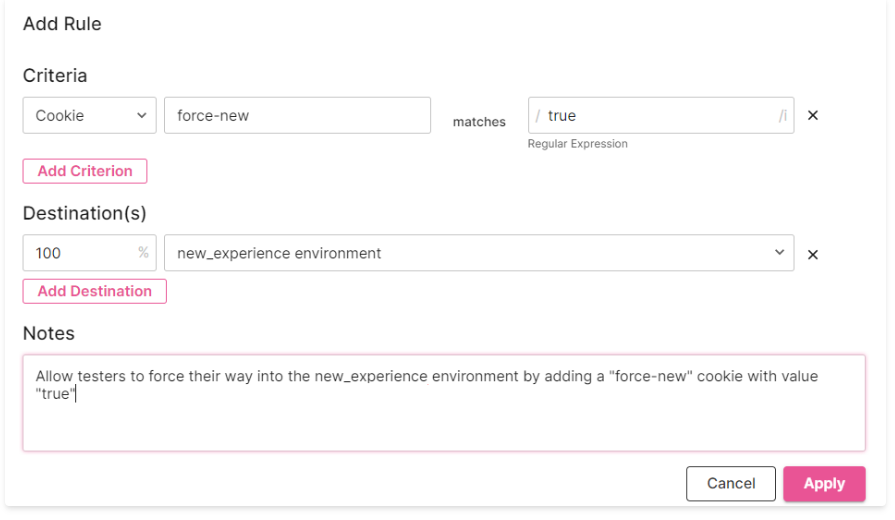
Adding Additional Rules
You can add additional rules to the traffic split as well. For example, you can allow testers to access a specific experience all of the time by setting a cookie value. In addition to cookie value, you can split traffic based on header value, path, IP address, URL parameters, device type, browser type, and bot boolean. Here’s an example:
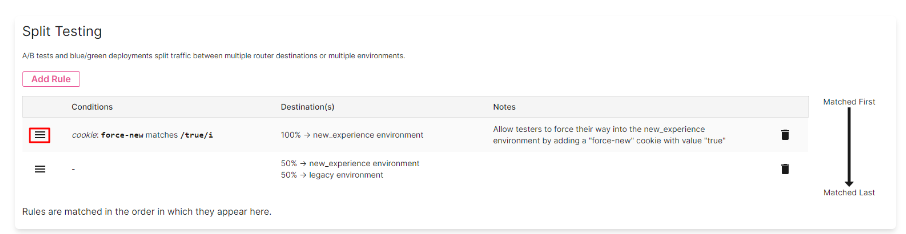
Rule Ordering
The order of rules is critical. Rules are matched from top to bottom. When handling a request, the first matching rule will be used for the request. Given the rules setup in the examples above, you would need to move the force-new cookie rule to the top so that it takes precedence over the other rule that splits all traffic without any criteria. Use the “grip” icon to reorder rules by dragging and dropping:
Step 4. Complete the Configuration
Click the Activate button at the top of the environment:

Common Pitfalls for Site Migrations
- Incomplete routing for static assets, eg.
/images/header.pngonly exists on thelegacyenvironment but there are no routing rules for that file.- For example, a new page at url
/about-usis being rolled out. Thenewpage has its static image assets at/images/*but thelegacysite also has static images at/images/*. As a result, without careful routing rules, thenewpage might try to load missing files from thelegacyenvironment. - One way to solve this is to ensure that static assets from the
newsite live at a completely distinct path from where they live at thelegacysite. In the previous example, thenewsite might be built with static images located at/img/*while thelegacysite has those files at/images/*. The router can then proxy thenewsite for all/img/*paths and thelegacysite for all/images/*paths. - If the paths are distinct, it is also possible to route the static asset based on the referer url. If the referer url matches a path that is defined as one going to the
newenvironment, any static assets should also be loaded from thenewenvironment. - If it’s not possible to separate the paths from the two environments, a fallback trick can be used whereby the router first tries to load content from one origin, and if that fails, automatically retries against the second origin.
- For example, a new page at url
- Missing or incorrect host header entries causing content not to load from the
legacyenvironment. - Links from
newcontent pointing to pages that are still in draft in thenewenvironment and which do not exist in thelegacyenvironment.